Quick Start
Vehicle Model Requirements
Ensure that your vehicle model has the appropriate Unity rotation and pivot points. The model should use the following axes: Z - Forward, Y - Up, and X - Right. If your model has incorrect rotation and/or pivot points, consult this guide.
Maintain a vehicle scale of [1,1,1]. Adjust the vehicle scale using the model import settings in Unity or 3D software prior to vehicle setup.
Physics Settings
- For PC games, it is recommended to change the
Fixed Timestepfrom the default 0.02 (50Hz) to 0.01667 (60Hz), 0.01 (100Hz), or even 0.00833 (120Hz) for smoother physics behavior. For mobile devices, set this value between 0.02 and a maximum of 0.03 (33Hz), but note that this may result in lower physics quality. - All NWH assets use only SI units (kg, m, N, etc.).
If making an open-world game with a large-scale map (> ~4000 units), the shifting origin is required (not only for this asset, but in general with game engines that use floating point precision). Explanation.
Automatic Setup
Vehicle Setup Wizard
To set up a vehicle automatically, use the VehicleSetupWizard.
Ensure that your vehicle has correct pivots and rotation first. Then, attach the VehicleSetupWizard to the root object of the vehicle—where the Rigidbody would typically be placed. Follow the steps from the wizard inspector.
The VehicleSetupWizard logs all actions, errors, and warnings in the console. Review and correct these manually if necessary.
Depending on the settings, you might need to set up the input manually: Input Setup page
Manual Setup
Rigidbody
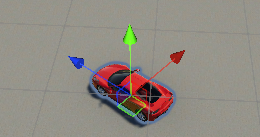
Add a Rigidbody component to the vehicle root, Car in the image above. Set the mass to a reasonable value, e.g., 1400.
Colliders
Add a Collider (BoxCollider, MeshCollider, etc.) to the vehicle. Rigidbody requires a collider to function properly.
Variable Center of Mass
Add the VariableCenterOfMass component to the vehicle root. This is not required but is recommended, as it allows for the adjustment of the Center of Mass and Inertia, both of which significantly impact handling. For Unity 2023 and newer, you can adjust the center of mass and inertia tensor directly on the Rigidbody, so this script will not be needed.
WheelController3D
For a vehicle to function properly, it requires wheels. NWH Vehicle Physics uses the included asset WheelController3D instead of the default WheelCollider. For more information, consult the WheelController Setup page. Since v10.0, WheelCollider can also be used.
- Attach the
WheelControllerto a separate object from the wheel. This object will serve as a suspension anchor and represent the beginning of spring travel. Position it above the wheel center. The easiest way to create these objects is to duplicate the existing wheel objects, remove all components except theTransform, and move the duplicated objects slightly above the wheel center.
- Add the
WheelControllercomponent to the objects created in the previous step. TheWheelControllerwill initialize itself with default values and attempt to set the necessary fields automatically. Ensure the following fields are set:Parent- root object of the vehicle. Must have aRigidbodyattached. Car for this example.Visual- wheel model. Wheel_FL, Wheel_FR, etc. for this example.
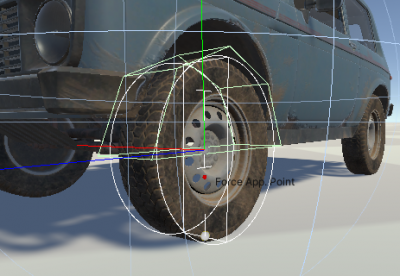
- Turn on Gizmos and select the wheels. The wheel gizmo and suspension gizmo will appear. Adjust the
WidthandRadiusof theWheelControlleruntil they fit the wheel model.
- Press play. The vehicle suspension is now functional. If the vehicle jitters, jumps, or exhibits other issues, check that the vehicle has a
Rigidbodyset up with the correct mass and at least oneCollider. For more information, consult the Troubleshooting section of the WheelController Setup page.
Input
- Check Input Setup.
The guide above is recommended for understanding of how input works. Below are the 'quick' steps needed:
- If using InputSystem (new Unity input package) add the following components to any object in the scene, e.g. SceneManager:
- If using InputManager (old/classic Unity input) add the following components to any object in the scene, e.g. SceneManager:
- Rewired integration is also available, and adding custom input sources is possible. More about that under Input.
Cameras
- Create an empty
GameObjectas a child of the vehicle and name it Cameras. Add a CameraChanger to it. - Add a
Cameraas a child of the Cameras object (right click ⇒ Camera) and attach CameraMouseDrag component to it. Assign the vehicle asTarget. - The CameraMouseDrag script is not required. Any camera, including Cinemachine ones, can be used with the CameraChanger.
VehicleController
- Add
VehicleControllercomponent to the vehicle root - where theRigidbodyis. VehicleControllerwill automatically set up default values and automatically set upDifferentials,Wheels andWheelGroups. Check console for output.- Go to
Settingstab and click onValidate Setupbutton to for automatic validity check. - Press play. Vehicle will now function but will not respond to any user input.
Assembly Definitions
This asset uses Assembly Definition (.asmdef) files. There are many benefits to assembly definitions but a downside is that the whole project needs to use them or they should not be used at all.
- If the project already uses assembly definitions accessing a script that belongs to this asset can be done by adding an reference to the assembly definition of the script that needs to reference the asset. E.g. to access VehicleController adding a NWH.VehiclePhysics2.VehicleController reference to MyProject.asmdef is required.
- If the project does not use assembly definitions simply remove all the .asmdef files from the asset after import.
Using LogitechSDK (which does not fature assembly definitions) will therefore require an addition of .asmdef file inside the LogitechSDK directory and a reference inside NWH.VehiclePhysics2.VehicleController or removal of all .asmdef files from the asset if you do not wish to use assembly definitions.
Video Tutorials
These videos have been created by Game Dev Project and are not official tutorials but they might help with the setup. Reading the documentation is still highly recommended.
Getting started with NWH Vehicle Physics 2 - Unity Asset Tutorial
Model to Driveable in Under 60 Seconds - NWH Vehicle Physics 2 for Unity


